Start Smart: Improve Your Road Descending!
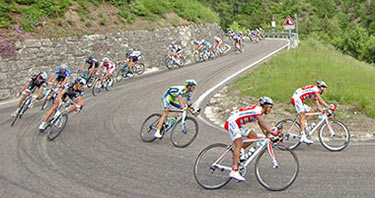
 If you're like us, you watch cycling whenever you can, the Tour de France on TV, videos of the pros online, and if you're lucky, in person at road races. One of the things you've probably noticed is how the pros rocket downhills and fly around even the sharpest corners (photo, left, click to see entire image).
While we mere mortals can't expect to match their descending skills, we can learn and improve by analyzing what they're doing and by practicing the techniques when we're descending. Plus, having the skills to go downhill better means safer road rides and more fun!
Make Sure Your Bicycle is Safe
Speaking of safety, going down any hill means going a lot faster than your maximum speed on level ground. So first, make sure your road machine is in tip-top shape. We're happy to help with whatever you need, from a quick safety check where we can identify any problems, to an extensive tune-up, to providing important accessories like helmets, gloves, eyewear and more.
We recommend checking the following components on your bicycle before hitting the hills. Note that these are basic guidelines and that we can't be sure exactly what your bicycle may need without inspecting it. Also, if you're not sure how to check and fix these things, please bring your bike in and let our service technicians get it ready for the road.
- The wheels are round and true (no wobbles) and are installed properly and securely tightened in place.
- The tires are fully inflated (check the pressure before every ride).
- The handlebars and stem, seat and post are tight and secure.
- The brakes work perfectly (no rubbing, easy to operate and excellent stopping power).
- The steering bearings (called the "headset") are properly adjusted. There should be no play and it should turn freely.
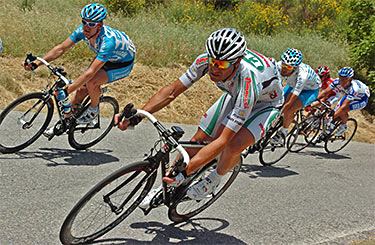
Get The Drop On The Descent Now that your bicycle's ready to go, the first thing we can learn from watching pro road racers descend is that they move into the position with the most control right at the top of hills. This position on a road bike with dropped handlebars is with the hands on the drops (the bottom part of the bars, photo). If your road bike has flat handlebars you can skip to the next section.
Gripping the drops on descents keeps your hands closer to the brakes so that you can easily control your speed and apply maximum braking power to stop in a hurry if needed. It ensures that your hands won't come off the bars if you hit a bump. It lowers your center of gravity for better cornering. And, it makes you more aerodynamic so that you are less buffeted by the increased wind at speed, and can go faster if you want to, too (just gently apply the brakes if you don't).
It takes a little practice to feel comfortable riding on the drops if you're not used to it. Try it on the flats and you'll probably soon enjoy leaning more forward, having your hands lower and going faster with the same effort due to the aero advantage.
We know that some riders have a hard time reaching the drops. And it's okay to descend while holding onto the brake hoods and sitting up higher. But, keep in mind that in that position you have less braking power and control, so it's best to check your speed a bit.
Also, there might be a reason it's hard to reach the drops. For example, some dropped handlebars come in different sizes and yours might be wrong for your arm length or hand size making them hard to reach. Or you might simply need to raise your stem to bring the handlebars closer to you. We're experts in fitting bicycles so that you can comfortably use all the riding positions. And we'd be happy to schedule an appointment to look at you on your bicycle and address any concerns like these.
One pro technique we don't recommend copying is their daredevil aero tuck, which you may have seen—hands close together atop the bars, torso kissing the stem, head super low ahead of the bars. This may win races but it's dangerous and not worth the risk.
Tip: When you're gripping the drops you should easily be able to extend your fingers to grip and squeeze the brake levers to slow and stop. If it's hard to reach the levers, the handlebars or brake levers may need to be adjusted. If you have small hands, the reach to the levers might need to be reduced too. Please let us know if you experience these issues and we'll be happy to take a look and advise.
Relax For Control and Comfort on Descents
With a safe bicycle, and riding on the drops, you are now ready to plummet downhill like a bowling ball in an avalanche—just make sure you're a relaxed bowling ball. Many riders tense up when descending and instead of helping, it compromises your control and can lead to discomfort.
If you feel tense, you may want to stop at the top and do some basic relaxation techniques. Try shaking out your arms and shrugging your shoulders to loosen your arm, shoulder and neck muscles. Touch your toes and reach for the sky to loosen your back and legs. And, be sure to breathe deeply to get some fresh air in your lungs and calm yourself.
Then, once you start the descent pay attention to if you're getting tense anywhere and try to control it and relax. Bend your elbows, relax your neck and shoulders, keep breathing and hold the bars firmly but not too tightly. Look 20 to 30 feet down the road so you can anticipate what's coming ahead. And look with your eyes tilted upward, looking forward instead of craning your neck.
It takes awhile to become confident so that you can relax like this when descending. Practicing by riding down a familiar hill a few times is a great way to improve. Always ride within your limits and keep it fun and safe.
Tip: Cyclists tend to steer where they look, so on descents where you're traveling quickly it's important to look at the right thing. Usually you want to look 20 to 30 feet down the road to see what's coming so you'll be prepared. But, in corners it helps to turn your head and shoulders slightly and look to the inside of the corner. Be sure never to fixate on anything in or beside the road or you could ride right into it. Look away and you'll be able to miss it.
Proper Braking
It's only natural to see a turn on a descent and want to brake for it, but there are right and wrong ways to do this. Your goal is to make it through the turns safely and in control. To do this, apply the brakes before the turns rather than in them.
This slows you when the bicycle is upright and not leaned over, which ensures maximum traction and control as you brake. Plus, once you've got your speed down you can carve the corner without touching the brakes unless you misjudged and need to gently apply them to slow a touch more.
In some long, hairpin corners and closely sequential ones you may feel yourself picking up speed rapidly. For these, try to brake only when your bicycle is more upright, near a 90-degree angle to the ground. That way you'll maintain the best traction and control
On downhills without too many turns use the brakes sparingly to keep your speed under control. Don't make the mistake of holding the brakes on the entire time, which can overheat the rims and reduce your stopping power when you need it most. It can also tire your wrists and arms. If the hill is so long and steep you need to brake more, simply pump the brakes, squeezing them for a bit, letting go and repeating as needed.
Tip: It really helps to know the descent too. If it's new to you, slow down, stay within your limits and keep it safe. Also, remember that road conditions change and there may be gravel or sand in turns or cracked pavement. If you're not sure it's always best to check your speed and ride cautiously, braking well before corners so you can avoid surprises and hazards.
Lean Your Bicycle, Not Your Body At speeds over about 10mph, you stop turning the handlebars to steer and start leaning instead to follow the curves in the road. Stay seated to keep your weight centered over the bicycle and relax.
Remember to look to the inside of the turns and lean your bicycle in the direction the road bends and you'll go right through turns nice and smoothly. There's no need to turn the handlebars or lean your body more than your bicycle.
Keep Your Inside Foot Up
As you lean into corners, the pedal on the inside gets closer to the pavement and it's possible to strike it on the ground in a tight turn. This can surprise you and even cause a crash.
So, always prepare for turns by raising the inside foot to the top of the pedal stroke. This puts your outside foot down and in the perfect position to press down with it and increase your cornering traction for more control.
You can also swing your upper body slightly away from the direction of the corner to ensure that you don't go through a curve too sharply. And, by pushing gently on your inside arm, you can exit a corner more quickly and smoothly.
May The Speed Be With You—And Your Friends
Ready to ride downhill with others? It's a lot of fun and you can even descend faster than alone by drafting each other (following and breaking the wind for each other). But because you're going so much faster than on level ground there are two key things to remember: Don't draft as closely, and don't pull as long on the front.
If you're new to group riding, practice on flat roads first in a small group and then head to the hills to work on descending. On downhills, ride a few feet behind the leaders, which gives you more time to react should they make a sudden move. It won't significantly diminish the aerodynamic benefit because at higher speeds, each rider's draft is larger.
Tip: When descending in a group of riders, don't make the common mistake of staring at the back wheel of the rider in front of you. Just check on him occasionally while making your main focus what's coming up 20 or 30 feet down the road. This lets you anticipate what's to come and set up for corners. If you can't see around the rider or group in front, slow and back off until you can see over or around them. Don't assume that they know the descent well enough to push it. If it feels unsafe or risky to you, it probably is, so back off and stay safe.
 When working with other riders down a hill, keep turns at the front short, around 20 seconds at the most. This is because the rider in front has to work much harder than those behind. If they stay in front too long and pedal hard enough to maintain speed, they'll tire quickly and actually slow the group down.
For example, on level ground, the leader works about 30% harder. But, on descents, he can work a whopping 600% harder! By taking short, quick turns, you'll share the effort and ensure that you descend faster while not tiring out one of your riding companions.
Tip: Short pulls are best for long, relatively straight descents where it's easy to change positions. Twisty descents that require changes in speed make swapping the lead more difficult so it's best to stay in front longer and switch when it's safest.
Spend some time working on these techniques and you'll master them soon and be able to enjoy descents more than ever. Stay safe, have fun and be sure to let us know if we can help you with anything, from a tune-up, to bicycle fitting to a brand-new road rocket. We're here to help!
